Nobody wants to be interrupted in a work meeting or, worse, inadvertently star in the background of a partner or roommate’s video call, so I imagine that other working-from-home people have also devised complex systems of hand/face/phone/eyebrow signals to silently communicate microphone and camera statuses at a distance. That’s stone age tech, though; the broadcasting industry solved this problem decades ago by installing bright red “On Air” lights outside studio doors that indicate when a studio is in use.
I recently set up a slightly more subtle take on this concept for my office (read: corner): a small light that turns on automatically when a camera or microphone is active. I won’t claim my solution elegant or even particularly good, but it does the job!
Although Amazon sells dozens of different brands of LED light strips, I couldn’t find anybody selling individual USB-controlled LEDs. Oh well, at least I looked. I probably wouldn’t have wanted to install whatever sketchy control software such a thing would require on my work computer anyway.
I soldered an RGB LED to a very cheap Arduino-compatible microcontroller breakout board (a knock-off of the Digispark, which I don’t think you can buy officially anymore), and wrote a quick sketch (Arduino-speak for program) to listen for colour codes sent over the USB cable. I also removed the board’s built-in test and power LEDs, since the power indicator would annoyingly be on all the time and the test LED shared a circuit with one of pins I had to use for the RGB LED.
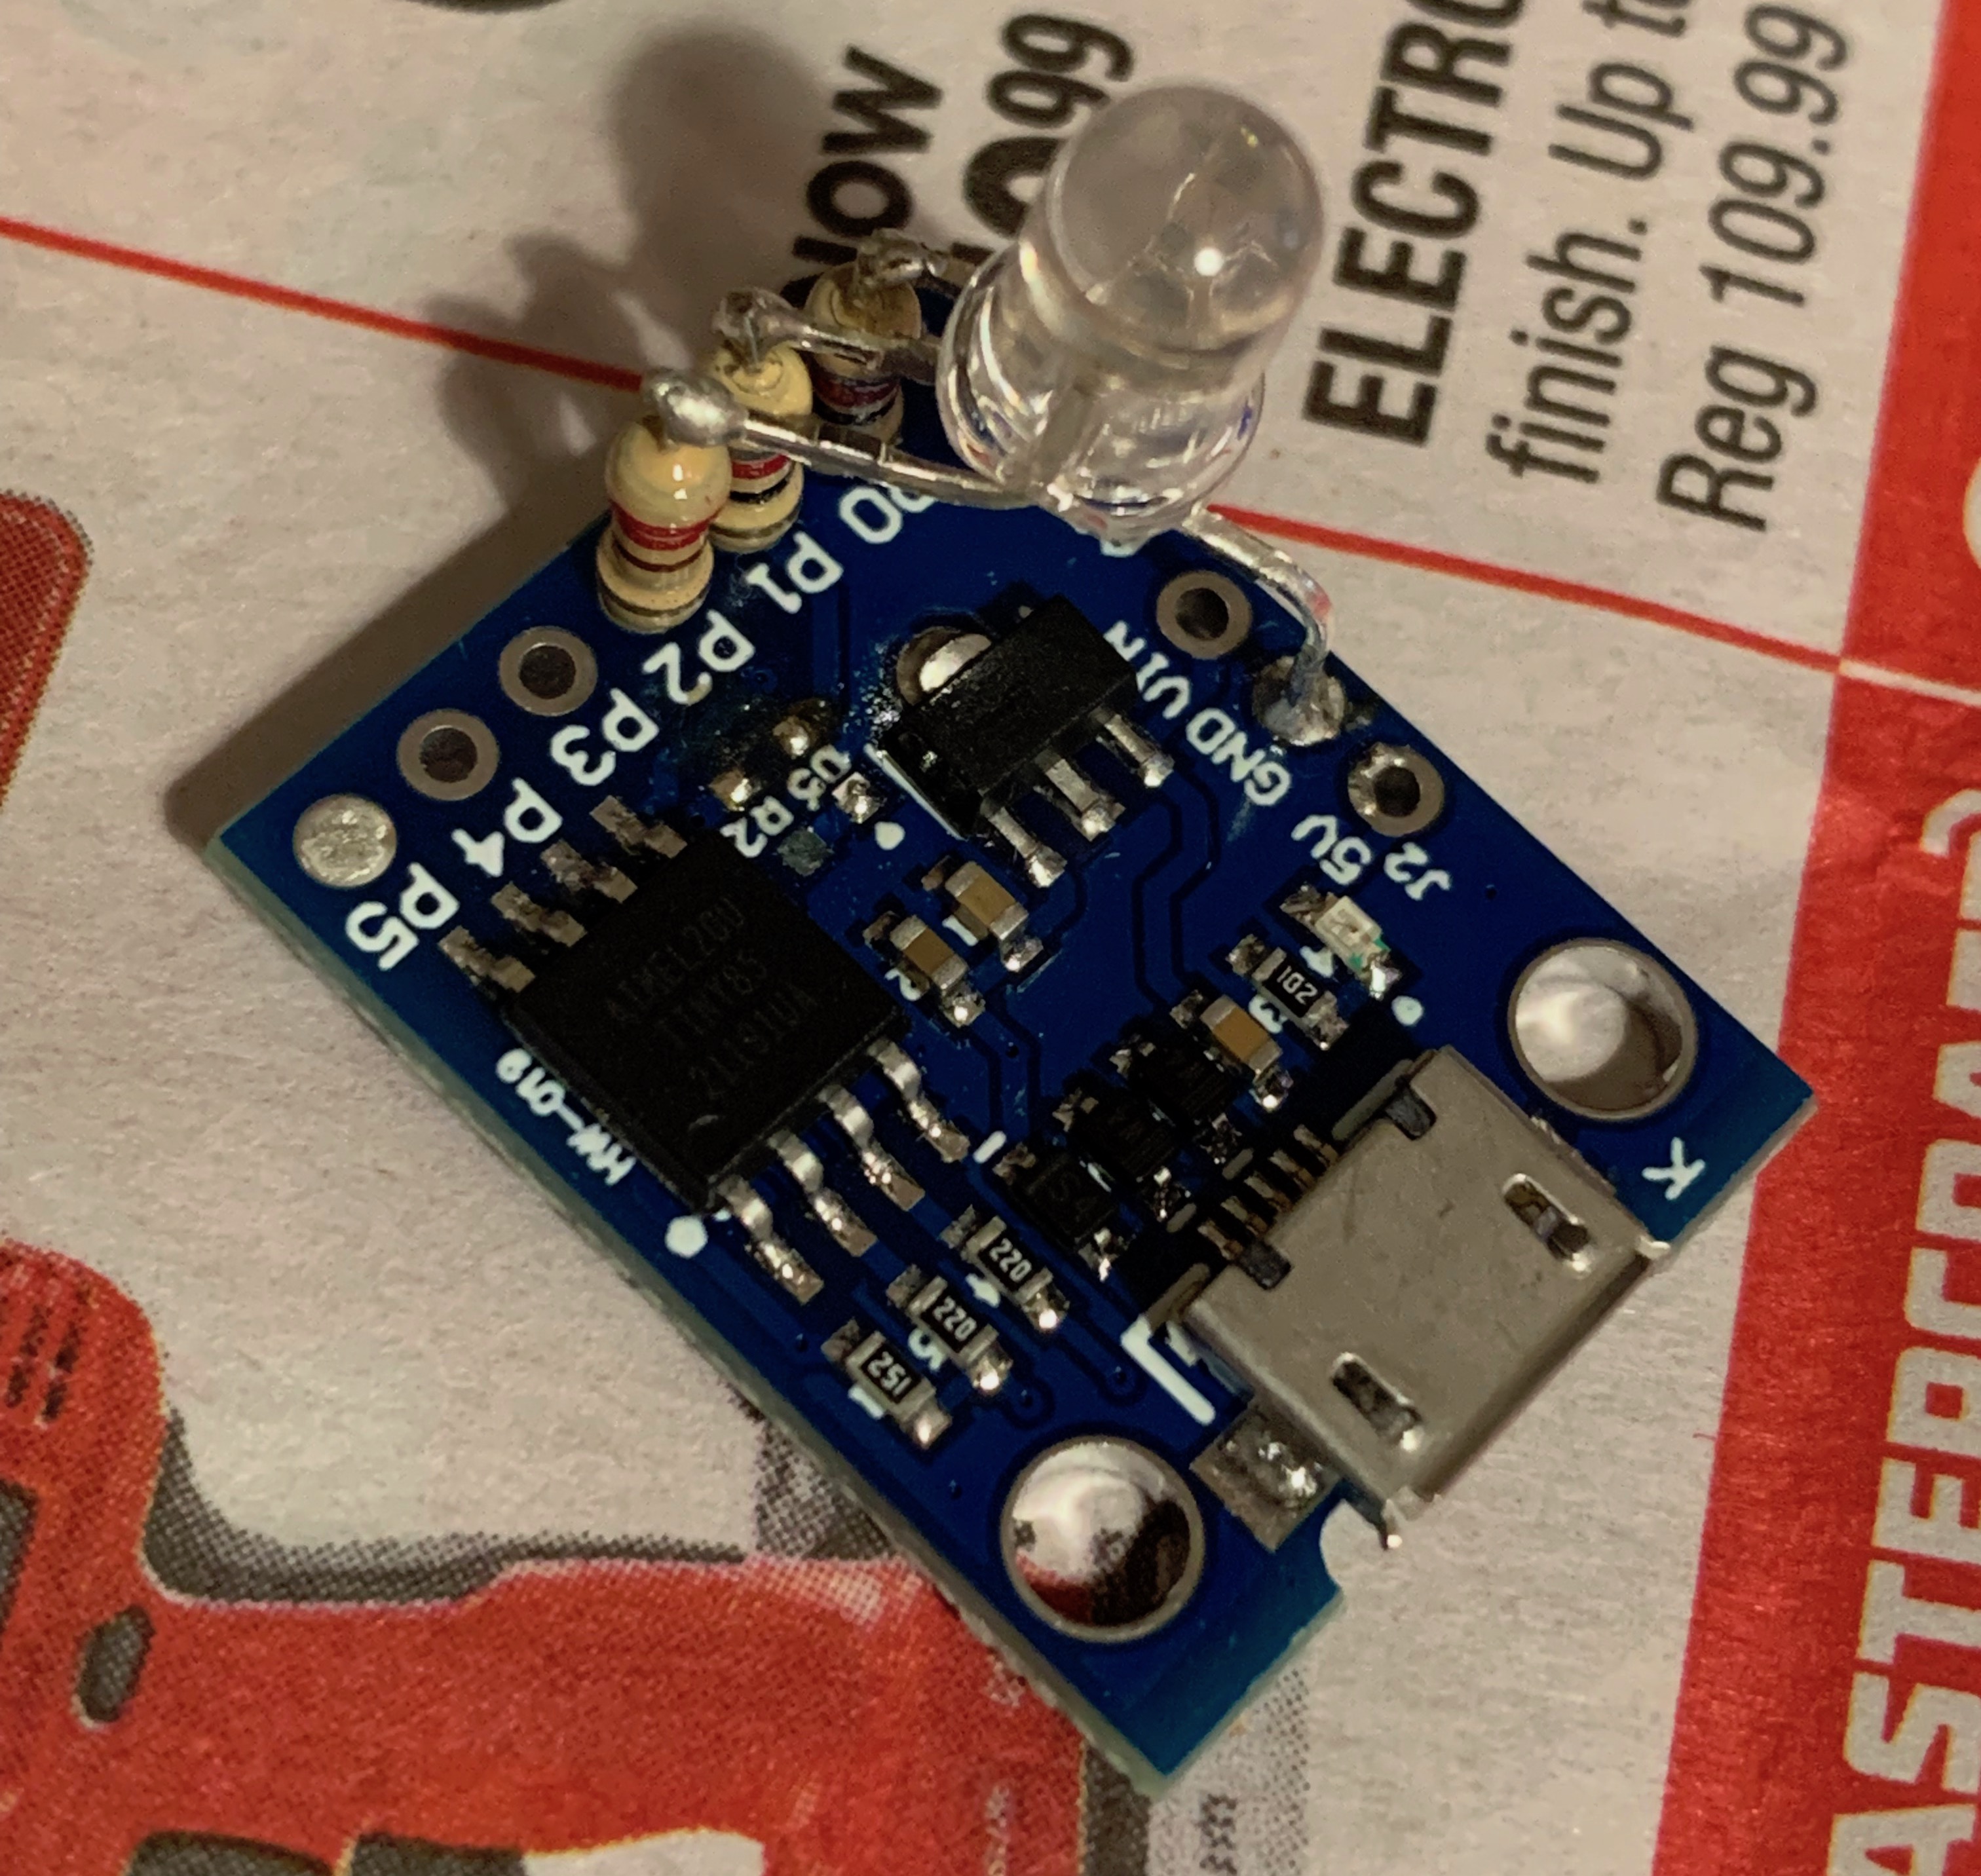
The sketch (code below) is pretty simple; it listens for a colour code in typical 8-bit-per-colour RGB hex format (e.g. ff0000 for red) and sets the three coloured LEDs to the appropriate brightnesses. The only complication was that the ATtiny85 microcontroller onboard the Digispark has only three PWM-capable pins and one of them is used for USB purposes; the hacky software-based PWM implemented in my sketch is to get around that limitation (although, since I ended up only driving the LEDs at full duty cycles anyway, it ended up being overkill).
On the computer side of things, I wrote a quick script to monitor the log written by Micro Snitch (a little app that watches the status of connected microphones and cameras) and turn on the LED when a device becomes active. Based on a cursory search, I decided that figuring out how to check mic and camera statuses myself would be a waste of time when Micro Snitch does it so well. For USB communication, I used DigiUSB, a firmware-only USB driver for the microcontroller that pairs with a handy rubygem to provide a serial-terminal-like interface between the computer and Digispark. Another library, DigiCDC, was supposed to be able to emulate a virtual serial device (which the computer could communicate with natively, no specific software required), but it didn’t seem to be compatible with macOS.
I loaded the Arduino sketch onto the Digispark, set the ruby script to launch at login on my computer, and stuck the LED board to the back of my monitor, where it’s in plain view as you approach my desk. (I added an origami waterbomb as a diffuser to soften the light a little bit.) Ta-da:

on_air.ino:
1
#include <DigiUSB.h>
2
3
#define RED PB2
4
#define GREEN PB1
5
#define BLUE PB0
6
7
/* PWM STUFF */
8
/* Fake PWM because not all the pins we're using support it at the hardware level */
9
unsigned long lastPwmTime;
10
unsigned long pwmInterval = 20;
11
12
struct pwmPin {
13
int pin;
14
unsigned char pwm = 0;
15
unsigned char tick = 0;
16
pwmPin(int pin) : pin(pin) {}
17
};
18
19
pwmPin red = pwmPin(RED);
20
pwmPin green = pwmPin(GREEN);
21
pwmPin blue = pwmPin(BLUE);
22
23
const int pinsLength = 3;
24
pwmPin *pins[pinsLength] = { &red, &green, &blue };
25
26
void setupPwm() {
27
for (int i = 0; i < pinsLength; ++i) {
28
pinMode(pins[i]->pin, OUTPUT);
29
}
30
lastPwmTime = micros();
31
}
32
33
void loopPwm() {
34
unsigned long currentTime = micros();
35
if (currentTime - lastPwmTime > pwmInterval) {
36
lastPwmTime = currentTime;
37
for (int i = 0; i < pinsLength; ++i) {
38
++pins[i]->tick;
39
digitalWrite(pins[i]->pin, (pins[i]->tick < pins[i]->pwm) ? HIGH : LOW);
40
}
41
}
42
}
43
44
/* DigiUSB STUFF */
45
/* Similar to how PWM is handled*/
46
unsigned long lastDigiUsbTime;
47
unsigned long digiUsbInterval = 2000;
48
49
const int inputLength = 6;
50
char input[inputLength]; // stores USB input
51
int currentInputIndex = 0;
52
53
void setupDigiUsb() {
54
DigiUSB.begin();
55
lastDigiUsbTime = micros();
56
}
57
58
void loopDigiUsb() {
59
unsigned long currentTime = micros();
60
if (currentTime - lastDigiUsbTime > digiUsbInterval) {
61
lastDigiUsbTime = currentTime;
62
if (DigiUSB.available()) {
63
handleChar(DigiUSB.read());
64
}
65
DigiUSB.refresh();
66
}
67
}
68
69
void handleChar(char c) {
70
if (c == '\n') {
71
if (currentInputIndex == inputLength) {
72
red.pwm = byteFromHex(input[0], input[1]);
73
green.pwm = byteFromHex(input[2], input[3]);
74
blue.pwm = byteFromHex(input[4], input[5]);
75
}
76
currentInputIndex = 0;
77
} else {
78
if (currentInputIndex < inputLength) {
79
input[currentInputIndex] = c;
80
}
81
++currentInputIndex;
82
}
83
}
84
85
unsigned char byteFromHex(char _16, char _1) {
86
unsigned char x = 0;
87
if ('0' <= _16 && _16 <= '9') {
88
x += (_16 - '0') * 16;
89
} else if ('a' <= _16 && _16 <= 'f') {
90
x += (_16 - 'a' + 10) * 16;
91
}
92
if ('0' <= _1 && _1 <= '9') {
93
x += (_1 - '0');
94
} else if ('a' <= _1 && _1 <= 'f') {
95
x += (_1 - 'a' + 10);
96
}
97
return x;
98
}
99
100
void setup() {
101
setupPwm();
102
setupDigiUsb();
103
}
104
105
void loop() {
106
loopPwm();
107
loopDigiUsb();
108
}
on_air.rb:
1
require "digiusb"
2
require "open3"
3
4
# [Micro Snitch](https://obdev.at/products/microsnitch) is an app that monitors and reports camera/microphone activity.
5
# This script tails Micro Snitch's log and updates an LED driven by an attached Digispark (an Arduino-compatible ATTiny85 breakout board)
6
# based on the camera and mic status.
7
8
# Requires:
9
# - libusb (`brew install libusb`)
10
# - digiusb (`gem install digiusb`)
11
12
# God bless https://zendesk.engineering/running-a-child-process-in-ruby-properly-febd0a2b6ec8
13
# for summarizing the various options for spawning a subprocess in Ruby.
14
15
LOG_FILE = "/Users/stephen/Library/Logs/Micro Snitch.log"
16
LOG_REGEX = /(?<type>Video|Audio) Device became (?<status>active|inactive): (?<device>.*)/
17
18
CAMERA_ON_COLOUR = "ff0000"
19
MICROPHONE_ON_COLOUR = "00ff00"
20
BOTH_ON_COLOUR = "ffff00"
21
BOTH_OFF_COLOUR = "000000"
22
23
microphones = {}
24
cameras = {}
25
26
digi = DigiUSB.connect()
27
28
Open3.popen2("tail", "-n0", "-f", LOG_FILE) do |_stdin, stdout, _wait_thr|
29
stdout.each_line do |line|
30
match = line.match(LOG_REGEX)
31
if match
32
devices = match[:type] == "Audio" ? microphones : cameras
33
devices[match[:device]] = match[:status]
34
35
digi.puts(
36
if microphones.values.include?("active") && cameras.values.include?("active")
37
BOTH_ON_COLOUR
38
elsif microphones.values.include?("active")
39
MICROPHONE_ON_COLOUR
40
elsif cameras.values.include?("active")
41
CAMERA_ON_COLOUR
42
else
43
BOTH_OFF_COLOUR
44
end
45
)
46
end
47
end
48
puts("Something went wrong...")
49
end